
Steal My Park Hopping Lightning Lane Multi Pass Strategy
Juggling Magic Kingdom, Hollywood Studios, and Epcot in ONE DAY can be a tricky to plan as there are SO many attractions. BUT if you only have one day to hit all the most popular rides, with the help of Lightning Lane Multi Pass and Standby Skipper, you CAN hit all the big hitters and then some! Here is my strategy to maximize your time and get the most out of your Park Hopping day at Walt Disney World.
Getting Started
Just a heads up! You need to understand how Lightning Lane Multi Pass works before reading this post! You can find what you need HERE.
First we’ve got to talk about getting ready for your day as you’ll need to be ready to go to book your first Lightning Lanes 3 or 7 days in advance (depending on your booking window).
Guests staying at a Walt Disney World Resort, Disney Swan & Dolphin, Disney Swan Reserve, or Shades of Green resort can book their 3 pre-selections 7 days in advance of their check-in date for the length of their resort stay.
Guests NOT staying at the above mentioned resorts can book 3 days in advance for the length of their date-based ticket. For Annual Passholders, those with special promo non-date based tickets, or other non-date based tickets, you can book 3 days in advance of the day you wish to use Multi Pass.
Standby Skipper is NOT able to book these pre-selections for you as they cannot purchase something on your behalf, so you will need to do that part on your own, BUT they can help if you are not able to get the return times that you want!

The goal of this strategy is to try and hit up as many Tier 1 Attractions as we can! We are starting our day in Magic Kingdom, so you’ll be purchasing Multi Pass for Magic Kingdom (don’t worry, you’ll still be able to park hop with this). For your pre-selections, I recommend Choosing Tiana’s Bayou Adventure for your Tier 1 attraction and Haunted Mansion & Pirates of the Caribbean for your Tier 2 attractions since those are also pretty popular rides.
If you are using Standby Skipper, you’ll need to make sure to have everything set up and linked so that you can put your first search request(s) starting at midnight on your park day. Learn more about what Standby Skipper is and how it works HERE.

Standby Skipper CAN Help With Pre-Selections
If you were unable to get the Lightning Lane return windows that you were hoping for, Standby Skipper can help! I do encourage you to try and modify your Lightning Lanes on your own as best you can, but if you have a ride that is just not working, you can cancel that attraction and let the captain get to work.
Standby Skipper goes live starting at Midnight on your park day, so you can set your searches up for any canceled Lighting Lanes then. Remember, you will still only be able to have one Tier 1 attraction at this time, so your search will need to reflect that.
In the example that I did, I was able to get Haunted Mansion and Pirates for pretty early, so I was happy with those, but I couldn’t get Tiana’s for any earlier than noon. So I canceled my Tiana’s Lightning Lane and set a Standby Skipper search for Tiana’s for ‘Morning’ and Standby Skipper was able to get me a return time for 10:35!

It is super important to note that I did ‘Morning’ rather than ‘ASAP’ as ‘ASAP’ will ONLY be searching within two hours of the current moment. So if I put that in at Midnight, it would be searching for 2am… obviously there is nothing available for 2am since the park is open, so that won’t work. But if I set the search for ‘Morning’ it will be looking for any time between park open and noon.
If you ARE able to get all the return times that you want with your pre-selections, then you don’t need to worry about this step and instead you will be ready to set up your next searches for the day.

Magic Kingdom Strategy
As I mentioned, our goal is to get as many Tier 1 Attractions as possible. BUT I also want to make sure that you aren’t doing a ton of backtracking and adding extra steps if we can. As we saw in my video, things can happen, rides can break down, and so not everything will always go perfect, BUT if we have a plan, it does help to keep your day magical.
After you scan into your first Lightning Lane of the day, you have a BUNCH of booking capabilities available to you such as being able to book more Tier 1 attractions, (tiers no longer exist at this point) and being able to book attractions in other parks.
Standby Skipper can help with the booking part, but you’ll need to put in your searches. Once you have acquired Lightning Lanes for your first three pre-selections, you’ll put in your searches for the next three. I would opt to set Standby Skipper searches for Jungle Cruise, Big Thunder Mountain Railroad, and Peter Pan’s Flight for ‘ASAP’. If it’s a particularly busy day, you might opt for ‘Morning’ to have a little broader of a search.

Then after you’ve snagged all three of those Lightning Lanes (remember, when you use one, you’re eligible to book another) you can put your final search for this park for Space Mountain. I opt to do this one last so that I don’t have to walk back and forth across the park, but if you would rather do this first, you can also rope drop this attraction and then you’d be ready to set up your searches for your next park!

Are You Really Saving Time on Your Phone?
You are plugging in your Standby Skipper searches as you SNAG them, not necessarily as you use them. The goal is to put these searches in as batches so that when you use one, you aren’t having to immediately jump back in your app for the next thing, you can instead let Standby Skipper do it’s thing and do the searching and booking for you. This is how you minimize the time spent on your phone.
So to recap what we’ve done so far, here is what you ACTUALLY did on your phone -
Purchased and booked your advance pre-selections
OPTIONAL set Standby Skipper search for any pre-selections you had issues with
Set your first batch of Standby Skipper searches for Jungle Cruise, Big Thunder, and Peter Pan’s Flight (sometime before you get to the park)
Set your Space Mountain Search.
And that’s it! Other than checking your notification to see when your return time is, you are spending a max of about 5 minutes doing all this as opposed to having to jump on the app after each ride and refreshing and modifying to get better times.
Planning a trip to WDW in Orlando and super confused about this thing called Lightning Lane Multi Pass? This guide is here to help!
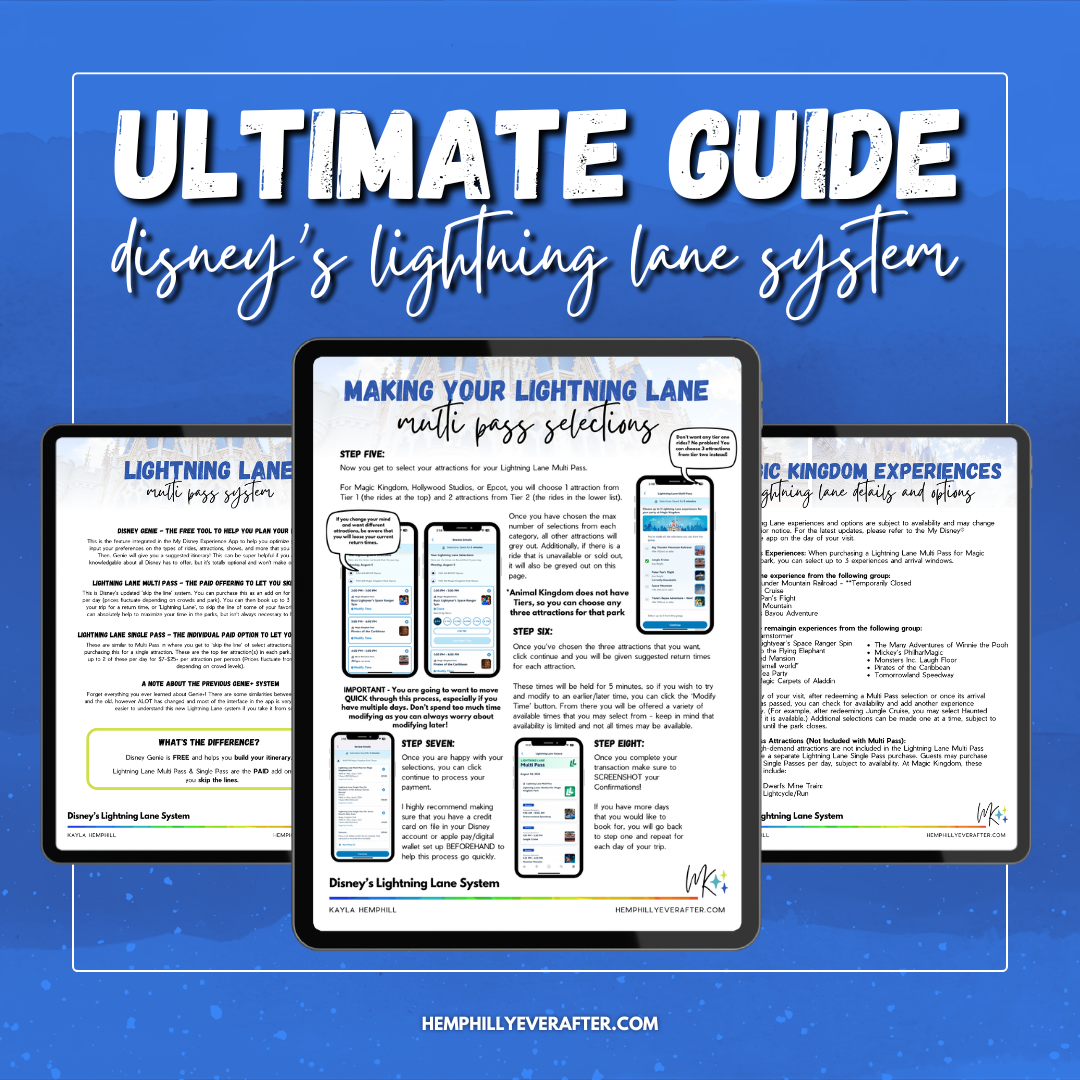
This 21 page guide will teach you everything you need to know to MASTER Disney’s Lightning Lane Multi Pass, Single Pass, and Virtual Queue Systems. You’ll get a full rundown of how these systems work (including screenshots) as well as additional tips & tricks to help you maximize your day using these systems. We’ll go over the free Disney Genie system that will help offer suggestions for your day, Lightning Lane Multi Pass Advance booking windows as well as what that process looks like, Lightning Lane Single Pass and how you can now modify these, AND some other things you may experience like ride closures and more.
Here is a full list of what’s included:
Page 1 - Title
Page 2 - Lightning Lane System Overview
Page 3 - Disney Genie - the FREE Planning Tool
Page 4 - Setting Up Disney Genie
Page 5 - Disney Genie - Other Features
Page 6 - Lightning Lane Multi Pass Overview
Page 7-8 - Making Your Lightning Lane Multi Pass Selections (with screenshots)
Page 9 - How Lightning Lane Multi Pass Works
Page 10 - Modifying Lightning Lane Multi Pass Selections
Page 11 - Multiple Experiences Lightning Lanes (aka when rides go down)
Page 12 - Lightning Lane Single Pass
Page 13 - Booking Virtual Queues
Page 14 - Lightning Lane Premier Pass
Page 15 - Tips & Tricks to Maximize Lightning Lane Multi Pass
Page 16 - Magic Kingdom Lightning Lane Attractions
Page 17 - Epcot Lightning Lane Attractions
Page 18 - Hollywood Studios Lightning Lane Attractions
Page 19 - Animal Kingdom Lightning Lane Attractions
Page 20 - Lightning Lane System Quick Start Guide
Page 21 - Plan Your Next Trip With Us!
*Please note that this is a PDF download and is NOT an editable file. Digital Downloads are best supported from a desktop or laptop computer and may not download from a smart device.
Hollywood Studios Strategy
Alright! Now that we have that all down, it’s time to plug in your Hollywood Studios searches. Remember, you’ll do this after you’ve BOOKED your last Lightning Lane in Magic Kingdom NOT after you’ve USED your last one. This ensures that Standby Skipper has the most amount of time to search and do it’s thing so that by the time you get to Studios, you’ll have three more Lightning Lanes stacked up!
I won’t lie, this park is basically impossible to not do a bunch of back and forth, but if you want, you can narrow your search into two’s to help.

Slinky is probably the hardest ride to get, so I would definitely prioritize that and maybe batch it with Toy Story Mania if you want to throw that in. I recommend doing these searches for ‘Afternoon’ - if you do ‘ASAP’, you may get a time that’s a little too early if you are still trying to finish up Magic Kingdom. Just as a heads up, Slinky Dog might be a little harder to snag, or it may snag you something later, so keep that in the back of your mind!
After you’ve snagged those two, I would set your search for Rockin Roller Coaster and Tower of Terror for ‘ASAP’. Now that you are in the park, you want those return times to be as soon as possible! If your Slinky Dog return time isn’t until later, I would cancel Toy Story Mania as you can always book that again later.

After snagging those, You’ll finish out by setting your Standby Skipper Searches for Mickey & Minnie’s Runaway Railway and Millennium Falcon Smugglers Run. These tend to be a little easier to get than some of the others and Smuggler’s run even has a single rider line if you are ok with splitting up with your party!

Epcot Strategy
And finally we are ready for our last park of the day! Epcot currently only has two actual Tier 1 rides that have long waits and that’s Remy’s Ratatouille Adventure and Frozen Ever After. So once you have snagged your final Lightning Lane in Hollywood Studios, you can set your searches for these two for ‘Evening’ or ‘Night’ depending on when you will arrive at the park.

This leaves you with one open Lightning Lane! I find that the other Epcot attractions are decently easy to get later in the evening, so you can keep using that last Lightning Lane to see how many of the other rides you can do! You can set these searches in Standby Skipper or book them on your own. If you do use Standby Skipper, I would do all of these as ‘ASAP’ so that you can knock them out quickly.
If you are exhausted from your park hopping day, you can also take the time to slow down and enjoy some yummy eats and shopping around World Showcase. And finish out your day with Fireworks!
And that’s it! If all goes according to plan, you’ll have ridden upwards of almost 20 rides!

A Few Notes
This is my typical strategy and it’s good to know that there will always be variables based on crowd levels, Lightning Lane availability, ride closures, etc. So definitely use this as a base, but also prioritize the things MOST important to you and don’t feel like you have to squeeze EVERYTHING in one day. Spoiler….. it’s not possible. I live here and go to the parks all the time and still have not seen or done it all!
BUT if you focus on those few things that are most important, anything else you get done is just a bonus and you won’t be disappointed! It’s only as fun as you make it, and you are on vacation after all.
Let me know in the comments your Standby Skipper, Lightning Lane Multi Pass, or Strategy Questions! Ready to get started with Standby Skipper? Just click the button below! Don’t forget to let the captain know that Kayla and Mark Alan sent you. (We earn a small commission when you do)

Don’t forget to check out my FULL VIDEO walking you through my day!

Planning a trip to WDW in Orlando and super confused about this thing called Lightning Lane Multi Pass? This guide is here to help!
This 21 page guide will teach you everything you need to know to MASTER Disney’s Lightning Lane Multi Pass, Single Pass, and Virtual Queue Systems. You’ll get a full rundown of how these systems work (including screenshots) as well as additional tips & tricks to help you maximize your day using these systems. We’ll go over the free Disney Genie system that will help offer suggestions for your day, Lightning Lane Multi Pass Advance booking windows as well as what that process looks like, Lightning Lane Single Pass and how you can now modify these, AND some other things you may experience like ride closures and more.
Here is a full list of what’s included:
Page 1 - Title
Page 2 - Lightning Lane System Overview
Page 3 - Disney Genie - the FREE Planning Tool
Page 4 - Setting Up Disney Genie
Page 5 - Disney Genie - Other Features
Page 6 - Lightning Lane Multi Pass Overview
Page 7-8 - Making Your Lightning Lane Multi Pass Selections (with screenshots)
Page 9 - How Lightning Lane Multi Pass Works
Page 10 - Modifying Lightning Lane Multi Pass Selections
Page 11 - Multiple Experiences Lightning Lanes (aka when rides go down)
Page 12 - Lightning Lane Single Pass
Page 13 - Booking Virtual Queues
Page 14 - Lightning Lane Premier Pass
Page 15 - Tips & Tricks to Maximize Lightning Lane Multi Pass
Page 16 - Magic Kingdom Lightning Lane Attractions
Page 17 - Epcot Lightning Lane Attractions
Page 18 - Hollywood Studios Lightning Lane Attractions
Page 19 - Animal Kingdom Lightning Lane Attractions
Page 20 - Lightning Lane System Quick Start Guide
Page 21 - Plan Your Next Trip With Us!
*Please note that this is a PDF download and is NOT an editable file. Digital Downloads are best supported from a desktop or laptop computer and may not download from a smart device.